OPPO BDP-80 Blu-ray Disc Player Firmware Update
How to Get the Firmware Upgrade:
There are three easy ways to upgrade your player's firmware.
If your player has an Internet connection:
1. Via Network - This is the easiest and fastest way.
If your player does not have an Internet connection:
2. USB Thumb Drive - Use your computer and a USB thumb drive.
3. Firmware Upgrade Disc - Use your computer to make a firmware upgrade disc.
If you are unable to perform one of the above methods, you can submit a request for a firmware upgrade disc which can take up to 1 to 2 weeks to allow for shipping time.
Warning: Although firmware upgrade is an easy and usually trouble-free process, it is important to ensure that the power supply to the player is stable, and the upgrade process is not interrupted. A failed firmware upgrade can render the player unusable.
Release Notes:
This version is designed for the OPPO BDP-80 Blu-ray Disc players. Comparing to the previous Official release version BDP80-25-0301, this version focuses on improving the physical disc compatibility:
- Resolved a disc loading failure issue with the "X-Men: Days of Future Past (BD)" released by 20th Century Fox.Customers reported that after inserting the Blu-ray disc, the player would report "Wrong Disc" error and eject the disc. This is caused by the new "BD+" protocol (or Digital Rights Protection system) applied to this title which requires longer decryption time than the value allowed by the player. This firmware adjusted the decryption time and resolved this issue.
All features and improvements of the previous firmware are also included in this version.
Firmware Upgrade Instructions:
Firmware Upgrade via the Internet
- Turn on your TV display and the OPPO player. Eject the disc tray from the OPPO player and remove any disc. Make sure that the player is connected to the internet and the player is not playing any content from a USB device.
- Press the SETUP button on the remote control to enter the setup menu. Select Device Setup, Firmware Upgrade, and then Via Network.
- The player will start searching for the new firmware from an OPPO firmware server. Please follow the on-screen instructions to complete the firmware upgrade process. Use the remote control to respond to on-screen prompts. Do not use the front panel buttons because the front panel buttons will stop working during the upgrade process.
- DO NOT ATTEMPT TO TURN OFF THE PLAYER, UNPLUG THE POWER, OR PRESS ANY BUTTONS OTHER THAN NECESSARY TO RESPOND TO THE ON-SCREEN PROMPT DURING THE REMAINING UPGRADE PROCESS.
- In order to complete the firmware upgrade process, the player will turn off automatically.
- Turn on the player again after the firmware upgrade process is completed. Repeat from Step 2 above until the player reports that it already has the latest version. This will ensure that the player downloads and installs all parts of the firmware update.
- Check the new firmware version by going to the setup menu, and then selecting Device Setup - Firmware Information. If you notice that the firmware versions displayed do not match the versions listed in this release note, please contact us to obtain the firmware files that are missing from a previous update.
- (Optional but recommended) From the setup menu, select Device Setup, Reset Factory Default, and then choose OK to reset the player settings. Enter your customized settings as necessary after resetting.
- Congratulations! You have just completed the firmware upgrade.
Firmware Upgrade via a USB Thumb Drive
- Click here to download the firmware file BDP80-26-1020.zip
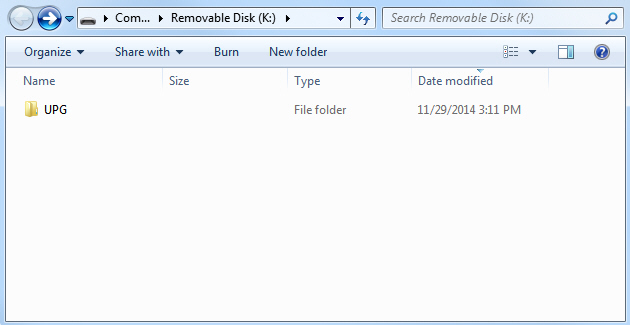
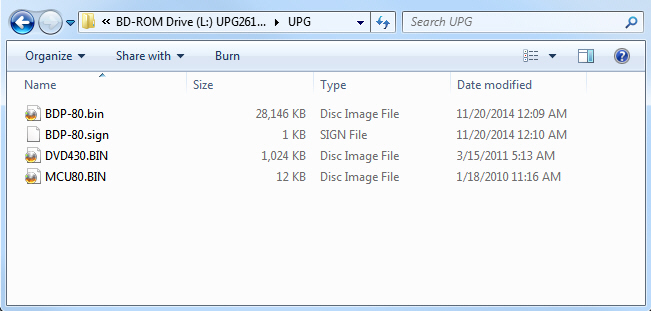
- Insert a USB thumb drive to the computer that stores the downloaded zip file. (The USB drive must be in FAT or FAT32 format, not NTFS. If you are not sure, just use a new USB drive that is 2GB or smaller since small drives are usually factory-formatted in FAT/FAT32.) Unzip the firmware file to the USB drive. Verify that the USB drive now contains a UPG folder and that the UPG folder is in the root/main directory of the USB drive. Please ensure that the UPG folder is not contained within any other folder. There are 4 files in the UPG folder: BDP-80.BIN, BDP-80.SIGN, DVD430.BIN, MCU80.BIN.

- Remove the USB drive from the computer.
- Turn on your TV display and the OPPO player. Eject the disc tray from the OPPO player and remove any disc. Make sure that there is no other USB device connected to the player.
- Insert the USB drive containing the firmware file to a USB port on the player's front or back panel.
- The player usually can recognize the firmware file and prompt you for firmware upgrade. In case the player does not prompt you, press the SETUP button on the remote control to enter the setup menu. Select Device Setup, Firmware Upgrade, and then Via USB.
- Please follow the on-screen instructions to complete the firmware upgrade process. Use the remote control to respond to on-screen prompts. Do not use the front panel buttons because the front panel buttons will stop working during the upgrade process.
- DO NOT ATTEMPT TO TURN OFF THE PLAYER, UNPLUG THE POWER, OR PRESS ANY BUTTONS OTHER THAN NECESSARY TO RESPOND TO THE ON-SCREEN PROMPT DURING THE REMAINING UPGRADE PROCESS.
- In order to complete the firmware upgrade process, the player will turn off automatically. Unplug the USB drive after the player turns itself off.
- Turn on the player again after the firmware upgrade process is completed. Check the new firmware version by going to the setup menu, and then selecting Device Setup - Firmware Information. If you notice that the firmware versions displayed do not match the versions listed in this release note, please retry the firmware upgrade procedure from step 4 to ensure all parts of the firmware package are installed.
- (Optional but recommended) From the setup menu, select Device Setup, Reset Factory Default, and then choose OK to reset the player settings. Enter your customized settings as necessary after resetting.
- Congratulations! You have just completed the firmware upgrade. Delete the UPG folder and its content from the USB drive so you do not accidentally install the firmware again.
Firmware Upgrade via CD
- If you requested a firmware CD from OPPO customer service, jump to step 5 of this procedure. You may also follow steps 2 - 4 to burn a firmware CD. (For Mac OS X users, a special CD burning tutorial is available here.)
- Click here to download the firmware CD image file BDP80-26-1020-CD-Image.iso.
- Use your favorite CD/DVD burning software to burn a firmware disc from the downloaded CD image file. While doing this, make sure you are not creating a new data disc, but burning from the already-created ISO CD image. Please consult your CD burning software's help/instruction manual for more information on how to do this. Some general instruction for common CD burning software is listed below.
- After the disc is burned, verify on the computer that the disc now contains a UPG folder, and inside the UPG folder there are 4 files in the UPG folder: BDP-80.BIN, BDP-80.SIGN, DVD430.BIN, MCU80.BIN. .

- Turn on your TV display and the OPPO player. Make sure that there is no disc in the player and no USB device is connected to the player.
- Eject the disc tray, put in the firmware disc, and then close the tray. The player usually can recognize the firmware disc and prompt you for firmware upgrade. In case the player does not prompt you, press the SETUP button on the remote control to enter the setup menu. Select Device Setup, Firmware Upgrade, and then Via Disc.
- Please follow the on-screen instructions to complete the firmware upgrade process. Use the remote control to respond to on-screen prompts. Do not use the front panel buttons because the front panel buttons will stop working during the upgrade process.
- DO NOT ATTEMPT TO OPEN THE DISC TRAY, TURN OFF THE PLAYER, UNPLUG THE POWER, OR PRESS ANY BUTTONS OTHER THAN NECESSARY TO RESPOND TO THE ON-SCREEN PROMPT DURING THE REMAINING UPGRADE PROCESS.
- Remove the disc from the tray when the tray ejects out. In order to complete the firmware upgrade process, the player will turn off automatically. In case the player retracts the tray and turns off before you remove the firmware disc, press the OPEN/CLOSE button on the front panel. The player will turn on and the tray will eject. Remove the disc at this time.
- Turn on the player again after the firmware upgrade process is completed. Check the new firmware version by going to the setup menu, and then selecting Device Setup - Firmware Information. If you notice that the firmware versions displayed do not match the versions listed in this release note, please retry the firmware upgrade procedure from step 5 to ensure all parts of the firmware package are installed.
- (Optional but recommended) From the setup menu, select Device Setup, Reset Factory Default, and then choose OK to reset the player settings. Enter your customized settings as necessary after resetting.
- Congratulations! You have just completed the firmware upgrade. Erase or discard the firmware disc so you do not accidentally install the firmware again.
General instructions on working with ISO image files
Note: These are general instructions on how to burn the firmware CD with common CD burning software. Please consult your CD burning software's help/instruction manual for more detail.
- In Nero Burning Rom version 6 or above , go to the 'Recorder > Burn Image' menu and select the ISO image you downloaded.
- In Nero Burning ROM version 5 or earlier, just go to Nero Burning ROMs 'File > Burn Image' option and select the ISO image you downloaded.
- In Nero Express select the option for 'Disc Image or Saved Project' to select the ISO image file you downloaded and burn to CD.
- In Easy CD Creator , go to 'File > Record CD from CD Image' and select the ISO image you downloaded.
- In Power2Go , go to 'Burning > Burn Disc Image' and select the ISO image you downloaded.
- In ImgBurn, go to 'Write image file to disc' and select the ISO image you downloaded.
- In burnatonce, go to 'File > Load New Image...' and select the ISO image you downloaded. Click the "Write" button to burn the CD.